Database Versioning
With the need to keep the environments aligned, we generated the database versioning step using the Liquibase tool.
We currently support the following databases:
- Microsoft SQL Server (2022/2019/2017/2016/2014)
- Oracle Database (23c/21c/19c/12.2)
- MySQL Server (8.0/5.7)
- PostgreSQL (16/15/14/13/12)
- DB2
With this feature you will be able to:
- Update your Database schemas structure.
- Rollback to the last immediate modification made to the database.
1. In the manifest repository's main branch of each environment and application, you will find the values.yaml file, it showld be in the following folder structure [environment]/[project]/[application]
2. In the values.yaml file, search for the Environment Variables section, you will find it like this:
## Environment Variables
3. Bellow the section title, add the following configuration and change the values as you need. This must be done in each environment and application values.yaml file:
  DB_HOST: "postgresql-prod"
  DB_PORT: "5432"
  DB_NAME: "postgresql"
  DB_USERNAME: "postgresql"
  DB_PASSWORD: "postgresql"
The value of the DB_PASSWORD environment should be uploaded as a secret, check the documentation in the Secrets Encryption section.
4. To enable the functionality, you must add the following feature flag to your pipeline file and set it to true. The activation of this feature flag means that every used environment will have database versioning:
- GitHub Actions
- GitLab CI
- Azure DevOps
- Bitbucket Pipelines
a. In the main branch you will edit the YAML file named .github/workflows/github-ci.yaml
b. In the github-ci.yaml file search for the Features section, you will find it like this:
## Features -------------------------------------------------------------------------------------#
c. Bellow the section title, add the following configuration and change the values as you need:
    # Database Versioning
      db_versioning_enabled: 'true'
    # Indicate the type of database you will use (mysql | postgresql | mariadb | db2)
      db_versioning_type: 'mysql'
a. In the main branch you will edit the YAML file named .gitlab-ci.yml
b. In the .gitlab-ci.yml file search for the Features section, you will find it like this:
## Features -------------------------------------------------------------------------------------#
c. Bellow the section title, add the following configuration and change the values as you need:
  # Database Versioning
    db_versioning_enabled: 'true'
  # Indicate the type of database you will use (mysql | postgresql | mariadb | db2)
    db_versioning_type: 'mysql'
a. In your Azure Repo's main branch you will edit the YAML file named azdevops-ci.yml
b. In the azdevops-ci.yml file search for the Features section, you will find it like this:
## Features -------------------------------------------------------------------------------------#
c. Bellow the section title, add the following configuration and change the values as you need:
  # Database Versioning
  - name: db_versioning_enabled
    value: 'true'
  # Indicate the type of database you will use (mysql | postgresql | mariadb | db2)
  - name: db_versioning_type
    value: 'mysql'
a. In the main branch you will edit the YAML file named .bitbucket/envs.yaml
b. In the .bitbucket/envs.yaml file search for the Features section, you will find it like this:
## Features -------------------------------------------------------------------------------------#
c. Bellow the section title, add the following configuration and change the values as you need:
  # Database Versioning
  db_versioning_enabled='true'
  # Indicate the type of database you will use (mysql | postgresql | mariadb | db2)
  db_versioning_type='mysql'
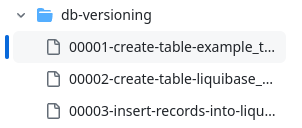
5. In the application repository you'll need to genereate the following folders structure:

- The db-versioning directory (which will be located in the repository root) will contain all the sql and xml files related to the changes to be applied to the database.
- The files that will be placed in the db-versioning directory must begin with a 5-digit numerical sequence, in ascending order as it is shown in the image above.
We recommend referring to the Liquibase documentation for the generation and understanding of the files involved. Attached are examples for quick incorporation.
Example of 00001-create-table-example_table.sql
--liquibase formatted sql

--changeset yourname:1
CREATE TABLE example_table (
    id INT PRIMARY KEY,
    name VARCHAR(255)
);

--rollback DROP TABLE example_table;

--changeset yourname:2
INSERT INTO example_table (id, name) VALUES (1, 'First Entry');

--rollback DELETE FROM example_table WHERE id = 1;
Example of 00002-create-table-liquibase_table_xml.xml
<databaseChangeLog
    xmlns="http://www.liquibase.org/xml/ns/dbchangelog"
    xmlns:xsi="http://www.w3.org/2001/XMLSchema-instance"
    xsi:schemaLocation="http://www.liquibase.org/xml/ns/dbchangelog
        http://www.liquibase.org/xml/ns/dbchangelog/dbchangelog-3.8.xsd">

    <changeSet id="3" author="mmora">
        <createTable tableName="liquibase_table_xml">
            <column name="id" type="INT">
                <constraints primaryKey="true"/>
            </column>
            <column name="name" type="VARCHAR(255)"/>
        </createTable>
    </changeSet>

</databaseChangeLog>
If you are using a SQL format, you will need to add the following rollback actions to you file:
--changeset liquibase-user:1
DROP PROCEDURE hello_world;
--rollback SQL STATEMENT
The rollback is performed by reverting to the last commit, this last commit must be the last change made to the database for the rollback to be considered successful. Taking as an example the following case:
Commit A --> Change in the database.
Commit B --> Change in the application code.
Commit C --> Change in the application code.
Commit D --> Need to make a rollback to the change in commit A
As commit A is not the one immediately prior to commit D, the rollback cannot be performed, in this case a new changset file must be generated containing the necessary structure so that the database is again in the same state as in commit A.