Azure DevOps
As you may have heard before, in order for ShamanOps to work properly, you must add some configuration and secrets to your CI platform. Here we will explain how to get your Azure DevOps platform ready for use.
1. Create a new project
First of all you will need to create a new project called shamanops in your already existing organization.
2. Service Connections
Once you've created the project, you will have to create 3 different service connections
- 2.1. GitHub Repo: Create a service connection of the type GitHub Repo with the following data
- Name: shamanops-automation
- Personal Access Token: will be provided by the ShamanOps team
- Check the box that "Grant permission to all pipelines"

- 2.2. Docker Registry: Create a service connection of the type Docker Registry with the follwing data
- Name: shamanops-registry
- URL: https://registry.shamanops.com
- Docker ID: The customer ID provided by the ShamanOps team
- Password: The token will be provided by the ShamanOps team
- Check the box that "Grant permission to all pipelines"
- 2.3. Azure Key Vault: Create a service connection of the type Azure Key Vault
- Name: shamanops-keyvault
- The Server URL, Subscription ID, Subscription Name, Service Principal ID, Service Principal Key and the Tenant ID must be provided by the customer and refers to the Azure environment
The key vault you define in Azure Devops must be previously created in Azure
3. Create a Personal Access Token (PAT)
Create a Personal Access Token in your Azure Devops organization and select the Full access scope. Save the token in a safe place, you will need it later.
4. Variables as Secrets
Once you've define the service connections, you will have to fill the Key Vault with the necessary variables for ShamanOps to start working. The variables will be loaded as a secrets, you can find out how here: Azure Key Vault Secrets
shamanops-customer-id *
This value will be sent by the ShamanOps team after registration.
Put this value between curly brackets.
Example: {2}
shamanops-argocd-dev-url *
You will get this data after the ShamanOps was successfully installed.
Put this value between curly brackets.
Example: {argocd.apps.customer.com}
shamanops-argocd-dev-user *
You will get this data after the ShamanOps was successfully installed.
Put this value between curly brackets.
Example: {user}
shamanops-argocd-stg-url *
You will get this data after the ShamanOps was successfully installed.
Put this value between curly brackets.
Example: {argocd.apps.customer.com}
shamanops-argocd-stg-user *
You will get this data after the ShamanOps was successfully installed.
Put this value between curly brackets.
Example: {user}
shamanops-argocd-prod-url *
You will get this data after the ShamanOps was successfully installed.
Put this value between curly brackets.
Example: {argocd.apps.customer.com}
shamanops-argocd-prod-user *
You will get this data after the ShamanOps was successfully installed.
Put this value between curly brackets.
Example: {user}
shamanops-argocd-drp-url *
You will get this data after the ShamanOps was successfully installed.
Put this value between curly brackets.
Example: {argocd.apps.customer.com}
shamanops-argocd-drp-user *
You will get this data after the ShamanOps was successfully installed.
Put this value between curly brackets.
Example: {user}
shamanops-code-quality-url *
This value is provided by the customer and refers to SonarQube endpoint URL.
Put this value between curly brackets.
Example: {https://sonarqube.customer.com}
shamanops-manifest-repository *
This value is provided by the customer and refers to the URL of manifest repository in GIT platform.
Put this value between curly brackets.
Example: {https://github.com/customer/manifests.git}
shamanops-manifest-repository-user *
This value is provided by the customer and refers to the username to access the manifest repository in GIT platform.
Put this value between curly brackets.
Example: {user}
shamanops-registry-url *
This value is provided by the customer and refers to the container registry specific URL.
Put this value between curly brackets.
Example: {ghcr.io/customer}
shamanops-registry-user *
This value is provided by the customer and refers to the username to access the container registry.
Put this value between curly brackets.
Example: {user}
shamanops-customer-token *
This value will be sent by the ShamanOps team after registration.
shamanops-argocd-dev-token *
You will get this data after the ShamanOps was successfully installed.
shamanops-argocd-stg-token *
You will get this data after the ShamanOps was successfully installed.
shamanops-argocd-prod-token *
You will get this data after the ShamanOps was successfully installed.
shamanops-argocd-drp-token *
You will get this data after the ShamanOps was successfully installed.
shamanops-code-quality-token *
This value is provided by the customer and refers to SonarQube Access Token.
shamanops-manifest-repository-token *
This value is provided by the customer and refers to the PAT to access the manifest repository in GIT platform.
shamanops-chat-webhook *
This value is provided by the customer and refers to the webhook of the chat platforms channel.
Put this value between curly brackets.
Example: {https://chat.googleapis.com/v1/spaces/xxxx/messages?key=xxx&token=xxxx}
shamanops-registry-password *
This value is provided by the customer and refers to the token to access the container registry.
shamanops-dockerfile-token *
This value refers to a token that can be used at build time, it was thought to connect artifact repositories like Nugets. This must be defined even if it is not used, containing some sort of value.
Put this value between curly brackets.
Example: {16958094567e3}
azdevops-pat *
This value refers to the Personal Acces Token you've created in step 3
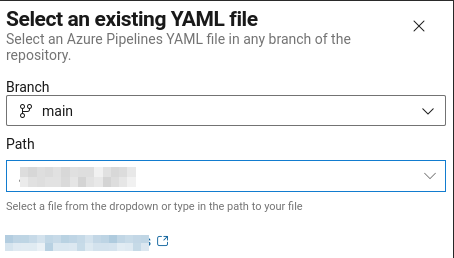
5. Create a YAML file
In the shamanops project Azure Repo main branch create a YAML file named azdevops-share-sc.yml with the following content:
###################################################################################################
############################# Azure DevOps | Share SC pipeline ####################################
###################################################################################################
trigger: none
pr: none
schedules:
- cron: '*/30 * * * *'
  branches:
    include:
    - main
  always: true
resources:
  repositories:
  - repository: automation
    type: github
    name: shamanops/resources
    endpoint: 'shamanops-automation'
    ref: main
stages:
  - template: azdevops/share-sc.yaml@automation
pool:
  name: onpremise
##################################################################################################
##################################################################################################
This job will share the existing service connections with the new projects that have been created, the frequency of execution of this job can be defined by the customer by modifying the value of **- cron: '/30 * * * * * * '
6. Grant permissions
Go to the shamanops project and grant the necessary permissions so it can use the 3 service connections you've created. (Find out how to do it here)
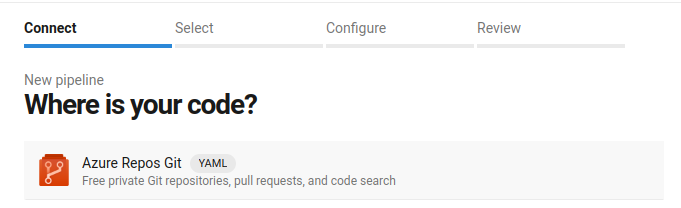
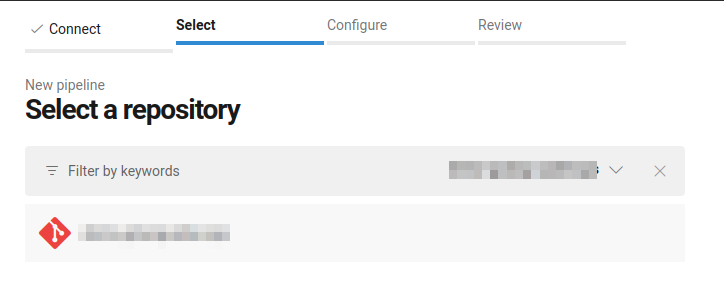
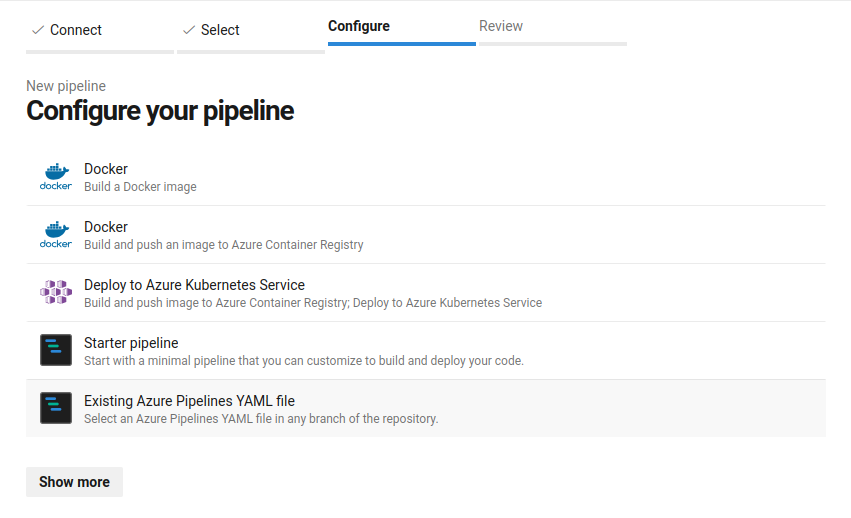
7. Create a pipeline
Create a pipeline and run it from the file created in step 5:
- Go to pipelines

- New Pipeline

- From Azure Repos
- Select Repository
- Existing Azure Pipelines YAML file
- Select file: azdevops-share-sc.yml in main branch
- RUN pipeline!
